


Homemade Sourdough Bread
If you’re new to sourdough, or haven’t had much luck baking your own bread, this simple and basic homemade sourdough bread recipe is for you.
Learning to make delicious and healthy sourdough bread your whole family will enjoy should be fun! Our every day recipe, with step-by-step instructions, makes it easy to bake traditional sourdough bread at home. If you’re new to sourdough baking, be sure to grab our eBook, Everyday Sourdough: Easy Recipes for the Everyday Baker.

This recipe is featured in our Sourdough eBook! If you love easy and delicious sourdough recipes (including gluten-free options!), click here!
Sourdough bread has become a favorite staple in our home. It’s versatile, nutritious, made with very few ingredients and relatively fool-proof. This recipe has been donned our “every day bread” because it’s perfect for dunking in soups or chili, works perfectly for sandwiches (it even slices without crumbling or squishing), however, our personal favorite is this french toast recipe!
Why is Sourdough better? Four Benefits of Sourdough Bread
- Sourdough Breaks Down Gluten – Because sourdough bread has a longer rising/soaking time, this allows for the proteins (gluten in wheat) to be properly broken down into amino acids, making it easier to digest. This is why some people who have a gluten sensitivity (NOT A TRUE GLUTEN ALLERGY) can tolerate sourdough wheat breads. (Source)
- Sourdough Bread has a Longer Shelf Life – During the fermentation process, lactic acid is created (which gives sourdough is recognizable tang) and predigests the grain for you. This acetic acid inhibits the growth of molds and gives the bread a longer shelf life.
- Sourdough is More Nutritious – Many of the simple sugars present in the grain are eaten up during the long fermentation process that sourdough bread goes through. This makes the bread easier on blood sugar levels. Because of the long fermentation process, there are also more nutrients in sourdough bread, especially B vitamins. Perhaps my favorite aspect of sourdough bread is that sourdough contains bacteria that activates phytase, an enzyme that actually breaks down phytic acid. Phytic acid is an anti-nutrient that’s present in all grains and seeds (to help protect them from nature) and binds to minerals in our body during digestion. By using sourdough, our body retains essential minerals. (Source)
- Sourdough is Sustainable – Sourdough bread only needs three ingredients: Flour, water and salt. Instead of needing to buy yeast for every loaf of bread, you can use your homemade starter. This cuts down on the number of ingredients needed in order to make a tasty loaf of bread.
Before You Bake Your Bread
There are a few things you’ll want to make sure before baking your sourdough bread. The first, you must have an active sourdough starter (if you don’t have a starter yet, read this post on making or obtaining a sourdough starter). Here are a few options for obtaining a starter:
- Ask a friend (they’ll gladly
throw some at youshare their bounty) - Find a bakery (our local bakery sells it for $1.50 per cup)
- Buy a starter culture (easiest and most reliable!)
- Start your own (NOT my recommended method…someday I’ll share how I tried “catching the wild yeasts of the air”, but not today, the memory is still too fresh.)
Traditionally prepared sourdough has a slow-rise time. This slow-rise allows for the grains to be properly broken down, neutralizing the harmful anti-nutrients, so our bodies can digest them easily without causing gut issues. But don’t let the time scare you away, the hands on time is probably less than most yeasted quick breads, it just takes a little more planning ahead for that fresh warm loaf of bread.
How Much Money Does Baking Sourdough Bread Save?
A LOT! In fact, I crunched the numbers and found out my family was saving over a grand each year by baking our own bread. I then started bartering fresh, homemade bread for farm raised chicken eggs and the savings were even larger. Read how my family saves over $1480 a year by making sourdough bread at home…surely that’s enough savings to buy yourself your new favorite kitchen gadget! Mine is “Persimmon”, (see all her beauty down below!) what color would you choose?
Simple Homemade Sourdough Bread Recipe
After you’ve baked a few loaves of homemade sourdough bread, you’ll likely notice that you prefer it with less tang…or more tang. With a single rise…or a double rise. BUT, until you’re ready to start experimenting deeper, here’s a very simple, basic sourdough bread recipe to start off with.
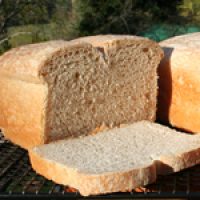
Sourdough Bread Recipe
Ingredients
- 2 1/3 cups active sourdough starter
- 3 1/3 cups organic flour
- 1 Tbs. sea salt
- 1 cup filtered water
- 1 Tbs avocado oil or butter, for greasing the pan
Instructions
- Add sourdough starter, flour, salt and 1 cup water to mixing bowl. Using a dough hook begin mixing on low speed.
- Continue mixing for 3-5 minutes, adding water or flour if needed. Keep in mind the dough will continue to moisten as it mixes. (You’re looking for a slightly sticky dough that wants to stick to your hand, but releases when you quickly pull away.)
- While dough is mixing, grease your loaf pans.
- Once dough is smooth and elastic, scoop it out and begin to fold it in on itself, shaping it into a long loaf in your hands (kind of like a hotdog bun, then sealing off the crease). If using two smaller loaf pans, be sure to divide dough in half.
- Place dough into greased pans. Slice lengthwise, about 1/2 inch deep, down the top with a sharp knife (to promote a nice rise).
- Loosely cover loaf pans with plastic wrap.
- Let bread rise until doubled (may take 6-12 hours depending on the temperature of your kitchen).
- Once dough has risen, preheat oven to 375℉. (You may melt a tablespoon of butter on the stove and brush the tops before baking if you’d like, this makes for a very pretty golden brown top, but is not a necessary step.)
- Bake for 45-50 minutes, until top is golden brown and bread sounds hollow when thumped with your finger.
- Immediately remove from pan and allow to cool completely on wire rack before slicing (if you have enough self-control!).
- Once bread has cooled completely, store in a bread box or wrap in aluminum foil.
Notes
- Be sure to start with active, fed sourdough starter, fed within the past 4-12 hours.
- Grease your pan(s) with avocado oil and add an extra teaspoon or two to the bottom of the pan. When you place your dough in the pan, give it a spin to coat all sides with oil, this eliminates the need to brush the tops with melted butter before baking and you’ll still get a nice golden brown crust.
- If your bread rises too quickly, find a cooler area of your home to set it. If it rises too slowly, try placing on top of your refrigerator, or a warmer area of your home. You’re aiming for 6-8 hour rise time to neutralize the phytic acid in the grain.
- This bread freezes very well. I like to bake two loaves at a time and throw one in the freezer for busy weeks when schedules don’t allow for bread baking.
- After 12 hours, if your bread doesn’t rise, go ahead and bake it anyway. Use the bread for croutons, bread crumbs, dunking in soup or french toast. Then, try feeding your starter a couple more times (4-6 hours between feedings) and 4-6 hours before baking. Remember, we never let an ugly loaf go to waste!
Nutrition


How to Get Light and Fluffy Sourdough Bread – Three Critical Steps
- A very active sourdough starter – If your starter isn’t active enough, it won’t create a nice rise for your bread. If your starter has been stored in the refrigerator, it’s been hibernating (or living in a dormant state). Likewise, if it hasn’t been fed frequently enough, it’s basically starving and won’t have enough power to make your bread rise. Plan to remove your starter from the refrigerator 2 days prior to baking and feed it at least three times (about 12 hours between each feeding).
- Knead long enough to activate gluten – Kneading is a critical step to allow gluten in the flour to activate and fully develop. If kneading by hand, you’re looking at about 20 minutes of hands-on kneading time, which can be split up to avoid arm fatigue. If you’re using a stand mixer, you’ll need less time, but you’ll also want to make sure your dough doesn’t overheat. Between 5-10 minutes should be adequate, but you might need to let the dough rest half way through mixing. If you’re not sure you’ve kneaded enough, you can do the “window pane test”. Take a small pinch of dough and stretch it, if it breads before being stretched thin enough to see light through, continue kneading.
- A long proofing (rise) time – Because sourdough is a natural yeast, it takes significantly longer to rise than commercial yeast. Plan on a 4-12 hour rise time. The time will vary based on your specific starter, how active it is, and the temperature and humidity of your home. Rise time can be manipulated and shortened by finding a warmer location in your home for your bread to rise, or by placing your loaves in a warm oven (around 100 degrees F) with a pot of boiling water. If your dough is rising too quickly, you can find a cooler location in your home. (Read more at the bottom of this post for tips on making a more sour loaf of sourdough bread!)
Sourdough Bread Tips & Tricks
Making Dough:
- Bake bread with active sourdough starter…this is IMPERATIVE! Using sourdough starter that’s at its “peak” (meaning all the yeas has eaten, but hasn’t begun to get hungry again). An active starter will have a slight dome-shape on top.
- Typically speaking, sourdough starter peaks about 2-3 hours after each feeding. But every starter is unique, so watch yours closely and you’ll learn when your starter is at its peak.
- Don’t be alarmed by the “runny consistency” of your dough. Sourdough recipes are wetter than traditional recipes made with commercial yeast.
- Use the “press your thumb to test for springyness test” before baking…just press lightly and see if it springs back! If it does, it’s ready!
- The “window pane test” works, too (described above). Try it!
During the Rise:
- It is possible for sourdough to over-rise, if this happens, when you bake your loaf, it will become a flat, hard disk. If this happens, use the bread for french toast or croutons.
- If you cover your loaf, be sure the dough is able to expand (it should more than double in size). If you cover your dough with something that’s too heavy, or doesn’t allow for the dough to rise, it can ruin your beautiful loaf.
- Try using the following methods to get a consistent rise time: a heating pad on low, the oven preheated to 100 degrees F (then turned OFF), the oven with just the light on, the oven with a pot of boiling water. Keep testing different methods to find which one works best for you and the climate of your home.
- Remember to consider the conditions of the seasons. In our home, we burn wood heat during the winter months, so our temperatures can be much warmer (or drastically cooler) than in the summer, but also much dryer.
- Depending on your temperature, your sourdough bread may not look like it’s doubled in size. If this is still the case after 8-12 hours, go ahead and bake it anyway, it may need the heat of the oven to get it’s last “spring”.
Tips for Manipulating the Sourness of Your Sourdough Bread
Whether you’re looking for a mild taste or a more tangy flavor to your sourdough bread, you can follow these tips to manipulate your sourdough starter and dough in order to produce a bread that tastes great to you and your family.
How to Make a More Sour Sourdough
- Adjust the starter
- Adjust the dough
Lactic acid and acetic acid are the two main acids produced in a sourdough culture. The vinegar-like acetic acid is the acid that gives sourdough much of its tang. By allowing acetic acid-producing organisms to thrive and multiply, you’ll get a more tangy finished product. Here are a few ways to obtain optimal conditions for these organisms to thrive:
- Adjust the starter:
- Feed your starter more flour to create a lower hydration level. This means you’ll feed your starter a higher ratio of flour to water (by weight). Acetic acid produces more abundantly in a drier environment. For a starter with 100% hydration, you’d feed your starter equal parts water to starter to flour, by weight (example: 1 cup water, 1 cup starter, scant 2 cups flour). For a drier environment, adjust these ratios as necessary until you find your preferred “sourness”.
- Use whole-grain flours as acid-producing bacteria love whole grain.
- Stir in the hooch! Instead of pouring off that brown liquid layer that forms on a hungry sourdough starter, stir it back in and it will add acidity to help develop more tang.
- Adjust the bread dough: Achieve a longer, slower rise by adjusting the following:
- Find a cooler spot for rising the dough. Because warmer temperatures speed up fermentation, cooler temperatures will slow down fermentation.
- Punch down at least once. By punching the dough down, this allows for gasses to be released and your dough will essentially “start over” with the rise, creating a more sour dough. (You’ll need to re-shape your dough into a loaf if you add this step.)
- Add a final rise. By punching down the dough, you’re allowing your bread to rise again. Once your dough has risen, you can prolong this final rise by letting it sit overnight in the refrigerator before baking. Take the dough out of the refrigerator and let it sit at room temperature for 30-60 minutes before baking. (Putting a cooler loaf into a hot oven will also create a better “oven spring”.)
How to Make a Less Sour Sourdough
- Adjust the starter:
- Feed your starter regularly. How often you feed your starter will be determined by the temperature of the room your starter is in. Typically, your starter should be fed every 8-24 hours. By increasing the frequency of feedings, you’ll create a more mild, less sour taste. This reduces the alcohol content and minimizes the overall acidity of the sourdough. Less acidity = less tang!
- Adjust the bread dough:
- Use more starter in the dough. More sourdough starter in the dough allows it to both rise in a cooler location and have a shorter rising time. By lowering the acetic acid production you’ll tame the sourness. (This will likely need adjusting by season: more starter in the winter, less starter in the summer.)
- Add baking soda. Because baking soda is an alkaline substance, it will neutralize some of the acidity and give the dough a boost in rise power.
The Differences Between Sourdough Bread and Traditional Bread:
- The dough – after you’re done kneading the bread, you’re left with a much different result. Sourdough bread dough will be much looser (sometimes even pourable, depending on the recipe), whereas traditional yeasted breads will have a firm dough.
- The rise times – traditional bread will rise and be ready for the oven in less than two hours. After two hours sourdough will look like it hasn’t even budged and usually takes upwards of 6-12 hours before it’s ready for the oven.
- The total time – traditional bread can be made with half a day’s notice (nice if you want fresh bread for dinner), whereas sourdough bread takes a little more advanced planning (however, if you’ve been keeping up with feedings, you can also whip up sourdough bread in the morning to be ready for dinner!).
- Success rate – traditional bread recipes tend to be pretty fool proof and are often successful on the first try. Not to discourage you, but there’s a good chance your first (or second, third, even fourth) loaf of sourdough bread will be a “fail”. But don’t despair, there’s always a use for a failed loaf of sourdough bread. I want you to be successful, that’s why I’m warning you! So expect it, and stick with it…it DOES get easier!

The History of Sourdough
It’s believed the Egyptians were the first to discover “sour dough”, the fact that flour and water can “come alive” to create a rise for a simple loaf of bread. How they figured this out is beyond me, but then again, so are most inventions!
In early towns, bakeries and breweries would be close by, and it’s likely that someone used mash from beer in their bread and realized it was darn right delicious! It was then figured that if they kept a bit of the dough for the next batch, the natural yeast would still be active enough for their next loaf of bread.
If you’ve ever tasted true sourdough bread, you know that the flavor and texture is much better than plain, unleavened bread. Over time, it was discovered that different grains like wheat, barley and rye were suitable for bread making as well. Soon families began passing down their starter (and the skill of bread making) to the next generation.
The term “sourdough” actually has a fairly short history, dating back to the California Gold Rush days of the late 1800s. Before gold miners went up into the mountains, they would stock up on supplies and provisions from the booming coastal town of San Francisco for their journey. Starters from that area have a unique sour tang. So, the starters (and bread) from that area became known as “sourdough”.
Now the term sourdough simply refers to any natural yeast bread starter.
How Sourdough Works – The Geeky Science Stuff!
Why is sourdough unique and how does it work? Unlike commercial baking yeast, which is a single strain of Saccharomyces cerrivasae, natural leavening is a much slower process. The reason commercial yeasts work so quickly is because they’ve been selected for their very fast-acting and easy to produce properties. However, these yeasts aren’t very adaptable and are intolerant of acidic environments.
Traditional sourdough starters contain a complex blend of bacteria and yeast. The yeasts (Saccharomyces exiges, relatives of S cerrivasae) naturally thrive on the surface of grains, fruits, vegetables and even in the air and soil. The exact strains in each individual starter will vary depending on the origins of the starter.
When a sourdough starter is healthy and active, the yeast and lactobacilli will thrive in a harmonious symbiotic relationship. The yeast uses carbohydrates to produce ethanol and carbon dioxide. This ethanol is then further converted by the bacteria to produce lactic acid. Carbon dioxide is present as bubbles, which become trapped in the stretchy dough, making it rise. The acidity created by the lactobacilli is inhospitable to other organisms, but great for the yeast. This helps keep a sourdough starter from going rancid by bad bacteria. If fed properly, a sourdough starter will be able to be kept at room temperature, without going bad. Because of the acidity in the bread, it will have a longer shelf life because the acid acts as a preservative, even after baking.
Did You Try This Recipe?
If you’re a lover of sourdough bread (and saving over a thousand dollars a year), then share this recipe with your friends on social media! If you have a question not addressed above, ask us in the comments below, chances are you’re not the only one with that question and others will be glad you asked.
I’ve had many failed attempts while baking bread, and had to make plenty of adjustments. Stick with it, and I’ll do my best to help troubleshoot where I can!
Are You Gluten Free, but Still Want to Enjoy Sourdough Bread?
You’re in luck! Hop over to our Gluten Free Sourdough Starter and Gluten Free Sourdough Bread recipes!


Is there a way I can get a hard copy of your book
Hi Kathy! The only way to get a hard copy would be to take the PDF from your purchase to a print store and get it printed out. I’m sorry we don’t offer any hard copy books.
Found this recipe on Pinterest. Wanted something simple, but still amazing. You did not disappoint!
I usually leave my sourdough overnight to rise and bake in the morning. Imagine my surprise when I woke to dough overflowing the bread pan! It was still firm, but very airy. I scrapped off the excess and put it in a small loaf pan. Baked them both and held my breath. AMAZING! Soft inside, great crust and SO tasty.
So my question is… can you elaborate on the loaf pan size. Large vs two smaller isn’t very specific. My two smaller are 6” x 4” and my “regular” pans are 9” x 5”. Thinking I should have divided into my two regular ones instead of one. (They are stoneware, so I like to invert the empty one as a lid to the other for the first half of baking – steam). Maybe my starter was just super active. Thoughts?
Hi there Jill! Thanks for your great review! My pans are absolutely bigger than a 9×5… they’re actually a 16×4 (I’ll update the recipe to reflect this, thanks!). My mom makes this recipe all the time using 6 3×5.75 inch pans for one batch. So depending on the size of your pan(s) you can scale up or down! Hope this helps!
If you’re really loving the sourdough bread, be sure to check out the artisan sourdough recipe… it’s so good! (Plus I’m working on a milk & honey sourdough bread recipe right now, too! That will be published soon!).
Hi! I would love to try out this recipe but my starter is a whole wheat starter and I will probably use a mix of regular and whole wheat flour for the dough… Will this change any of my measurements? I know whole wheat flours can make dough seem stiffer or drier. Hope you can help ????
Hi Kate! Yes, the ratio of flour/water will be different if you’re subbing your flour. Whole wheat flours take a bit longer to absorb liquid, so you’re going to want to knead your bread for a few minutes before deciding whether or not you need more liquid. I don’t have exact measurements for you, but it’s my recommendation to keep your dough on the wetter side. Start with slightly less flour than called for and add your water slowly. A wetter dough will be harder to handle, but you can even make it pour-able, like a really thick brownie batter. Just be sure your pan is really well greased or it will stick like crazy to your pan! Hopefully this helps guide you! Let us know how it turns out! Snap a photo and tag us on Facebook or Instagram! We love seeing the results!
Hi there. I have just subscribed to your Blog right now. Got a question for you please. My neighbor remembers his Mom making bread with a potato starter. She grated a potato, added salt and sugar plus water. This is all he can remember. Does any of this sound familiar and if so do you have a recipe for us for Potato Bread using this kind of starter.
Kind regards, Frances from Sunny South Africa
Hello Frances! I’ve heard of people creating a fruit water yeast and using it in their sourdough baking, much like you described with the potato starter, but I’ve never done this myself. I did a quick Google search and came up with this Potato Water Sourdough Recipe…does that look right? Best of luck and welcome!
Hi I am excited to try this but we don’t have a kitchenaid. In lieu of the dough-hook method, about how long should I hand knead, and is there a certain technique or just keep turning it over on itself? Thanks.
Hi Sara! You’ll want to knead for about 10-20 minutes until you have a nice smooth, elastic dough. When you try to stretch a small piece it should stretch thin without breaking right away. And just a simple folding and turning should do…the whole point is to get that gluten active and stretchy! 🙂
I was so looking forward to this bread today. My starter looked beautiful this murning and the dough came together to easily! At six hours it was just peaking over the pan, at 6-1/2 hours it had fallen! I went ahead and baked anyway and it ended up being 2-1/2 inches high. Did I wait yo long to bake? My house is about 72 degrees.
Oh no! So sorry to hear about that Kathy! It could have just been a bit too long on the rise. 72 is a good temperature, but depending on how active your starter is, 6 hours could be too long. How often do you feed your starter? And do you store it in the refrigerator, or do you feed it daily? How many hours apart are your feedings? I’d give it another try and just try letting it rise a bit less. Best of luck and feel free to ask any other questions!
I wondered if you had ever used a bread machine and if the recipient is the same
My hands hurt to much to do the needing
I bought a machine that said sourdough but I think it’s different still wants to ref test as well snd short time I can turn it off though and let it tide longer
Hi Paula! Great question…while I’ve never used a bread machine myself, I have heard you can use the bread machine to do the kneading. Because sourdough has a much longer rise-time than yeast breads, that’s probably the only thing you’ll want to do in the machine. I use my Kitchen Aid mixer with the dough hook to do my kneading. I agree, it’s tough kneading by hand! Hope this helps!
May I know the bread hydration, assume it’ bread flour you use ans ghee work?
Thanks Kelsey
Hi Vicky! My starter is 100% hydration and I use Bob’s Redmill organic unbleached white flour. Ghee should work great for greasing the pan! You can even brush a little ghee on top of the loaf of bread once it’s done baking. This helps keep the crust soft if you want to use it for sandwich bread.
sorry kelsey, i meant dough hydration & not SD. presumably einkorn, emmer or spelt flour can be replaced for white by adjusting H2O. It would great be great if doable because I seldom use white flour
Thanks again Kelsey
Ooops, sorry Vicky! I missed that you were asking about the hydration of the BREAD! Honestly, I’ve never calculated the hydration of my bread as I use measurements instead of weight. BUT, if my math skills haven’t escaped me, the recipe calls for 3 1/3 cup flour, 2 1/3 cup starter and 1 cup water. So that’s equal parts flour:liquid by measurement so it’s probably close to 50% hydration. But, because I’m not weighing it I can’t be sure…but next time I make a loaf I’ll be sure to measure and update the post!
This post is so informational for my brand new sourdough venture. My only question is if you know if there’s anything I need to do different as I’m in Colorado at over a mile up elevation.
We’re glad you found the post informative! I don’t have an exact answer about elevation as I’ve never baked at high altitudes. But I found this post to be very helpful! https://www.wheatmontana.com/content/high-altitude-baking-how-make-your-recipes-work-mountains
Thank you so much for that link. I will use it in conjunction with yours and see what I come up with 🙂
I just made this recipe for the second time, rising right now:) My dough is very loose, even after I added about 3/4 cup extra flour. The slice I made on the top just closes back up. My bread had a great flavor, just wanted to make sure I’m not doing something wrong. Thanks!
Awesome! So glad you like the bread, Janie! We agree about the flavor…SO GOOD! As far as your dough being loose, do you know the hydration level of your starter? This recipe is best if using a starter with 100% hydration. That’s fancy lingo for a starter that’s fed equal parts starter : water : flour by weight. But since I NEVER weigh my ingredients, it’s 1 part starter : 1 part water : scant 2 parts flour (or for example: 1 cup starter, 1 cup water and just under 2 cups flour). Many prefer a looser dough because it yields a fluffier loaf of bread. We like to meet somewhere in the middle because I want it to be firm enough to slice for sandwich bread, but not so dense that it’s no longer good for a sandwich. If you’re wanting to experiment more with everyday sourdough recipes, be sure to sign up for our newsletter, we’re just about to launch a Sourdough eBook filled with easy, healthy and yummy sourdough recipes for the everyday cook! Happy baking Janie!
Making your bread this morning and wonder what the pan sizes are that you talk a about. A 9×5 just seems to small for all the dough.
Hi Bobbi Jo, great question! This recipe makes 2 loaves. So you can divide it between your two pans. I have regular sized bread pans and an extra large pan, so when I’m lazy I just toss all the dough into the one larger pan. But this recipe is technically for 2 standard size loaves. Best of luck!
Your recipe does not require a first rise before putting in loaf pans to rise again?
No, it doesn’t Bobbi Jo! Once you mix the flour, water, salt and starter together, you form your loaf and let it rise approximately 6-8 hours in the loaf pan. A MUCH simpler loaf of bread than the double rise method!
I’m trying to learn the art sourdough making. Thank you so much for posting your recipe. I really don’t know much about all this yet but one tablespoon salt seems like soooo much. I just want to make sure this is correct or if it’s to be 1 teaspoon salt.
Hi Jan! You read that correctly! One Tablespoon of salt. Because there are so few ingredients, the bread really needs it for flavor…trust me, I’ve forgotten to add it before! 😉 Keep in mind, this recipe yields two regular loaves or one large loaf of bread! Best of luck! Once you get the hang of sourdough baking, it’s so rewarding (and delicious!). Best of luck!
Does this recipe have to be baked in a loaf pan? Can you shape it into a loaf and bake it on a sheet pan? I like the shape better than the typical square you get from a loaf pan.
Great question Mitch…at the measurements listed in the recipe, you’d want to use a loaf pan…however, if you increase the flour slightly (by say 1/4-1/2 cup or so), you should have a stiff enough dough to form a loaf. Let us know how it works! Happy baking!
My first batch turned out beautiful and now I can’t get my loaves to rise well. What am I doing wrong :/?! Any suggestions for troubleshooting?
You might not be doing anything wrong! How often are you feeding your sourdough? What’s your feeding schedule like? Are you keeping it out on the counter, or refrigerating it? If you feed it more frequently (every 4-12 hours) you’ll get more active starter, but if you’re only feeding once a day, it might get sluggish, especially in colder weather. Also, what’s the temp where your bread is rising? If our house is at or just below 70 degrees, the bread will take much longer to rise than when it’s above 72. Try warming up your oven just a bit, turning it off and letting it rise in there. And my last question is if you’ve switched the type of flour you were feeding it at all? There’s a method for changing over your starter to a new flour. Let me know and hopefully we can troubleshoot the reason! Until they’re nice loaves, you can make bread crumbs, croutons or use it for french toast or bread pudding!
mmm Sounds delicious! Thanks for the ideas!
I’ve really been into making my own bread…will need to give this one a try.
What a beautiful recipe. LOVE sourdough!
There is nothing like homemade bread. The aroma, the process, and the taste. Your sourdough recipe sounds lovely.
Thanks Emily! We love it. Yes, the aroma when baking is the best!
Yummy! This looks so good and sourdough is my favorite!
I’m working on a sourdough starter but it called for yeast to get the starter going. Do I need to find a recipe that is yeast free?
I would…I don’t have experience starting a sourdough starter with yeast and am unsure if this yeast is the same as heirloom starters. Many people make a sourdough starter by simply combining flour and water for 7-14 days and “catching the wild yeasts in the air”. I tried this method and it failed. Now, if my starter dies, I just run up to our local bakery and buy some for $1.50. That’s certainly a MUCH faster way to procure a starter! The only ingredients for sourdough bread should be flour, water and salt (plus starter, but that’s also just flour and water). Does this answer your question? Good luck!
Your bread sounds delicious. That is one of my projects to be done soon. I’ve made sourdough pancakes, waffles, bicuits, English muffins, and crackers. All were delicious! Sourdough baking is fun. I keep my starter on the counter and feed twice a day when I am in the baking mood. When I need to rest fro it, I put it in the fridge and feed it weekly. It works with your schedule.
Hi Gretchen! We love sourdough too! I haven’t had a chance to try sourdough crackers yet…have a recipe to share? Good luck on your bread baking adventures and be sure to let us know how it goes! Also, keep an eye out for an upcoming “sourdough troubleshooting” post! It’ll be full of tips and tricks for sourdough bread baking.
I made sourdough bread!! I can’t believe it!! It was pretty overwhelming at first, but so gratifying!! My bread was amazing!! I let it rise for 8 hours, started it at 6am while it was still pretty cool since it was a really hot day I didn’t want it to rise too fast! This is a great bread recipie, my starter is getting out of hand so I will be keeping it in the fridge! She’s pretty high maintenance ????
I’m going to try and make a sour dough starter with gluten free flour…there are soooooooo many variations/opinions out there on what types of GF flour to use, so I’m a bit intimidated!
I never had luck starting my own. It may be possible to buy some starter and transition it to a gluten free flour. I am not informed on GF sourdough. But I have read about studies done in Italy where people with gluten intolerances are able to eat true sourdough bread that has risen for a minimum of 7 hours. If you were going to give this a try I’d use Einkorn flour or Spelt flour as they’re ancient grains that haven’t be hybridized and are easier to digest. If you do try a GF sourdough, let us know how it works out!
I’ll make this for Jay soon..sourdough is his fav!! Hey! Ummm….why do you keep your butter wrappers in a baggie???
Great observation and even better question! That does seem weird, doesn’t it? I save my butter wrappers in a bag in the freezer for greasing my loaf pans!!
Oh!! Great way to save money!!
I looked all the way through the comments to see if anyone had asked this question. lol. It IS a good idea! I’m going to try this recipe next…I’ve never made sourdough without the double rise…